
.jpg.50cb03ca70bea89c855ae6489ac23d31.jpg)
.jpg.014d1f488c3f21f1e07ceb4c88da4a32.jpg)
.jpg.dc9393d0e4e6ddc714b0b686708e2082.jpg)
.jpg.ea54ce3e4361c741a9d3e9a2b697d1b7.jpg)
PinMe! allows setting individual windows to TopMost (window always on top) with the following additional features;
- Setting windows to TopMost / NoTopMost
- Changing window transparency levels
- Window captures and region captures
- Desktop captures (foreground and background)
- Basic window statistics
- Window information; dimensions, sizes, styles, etc.
Installation
As of version 0.8.9 PinMe! runs on Windows 10 (Build 14393) and later, including Windows 11.
Extract PinMe! from the archive and copy to a directory from where it can be run.
If you want to have PinMe! run at each startup click on the "Run at Start-Up" option in the menu. A copy of PinMe! will be saved to the Windows "Startup" folder.
TopMost / NoTopMost
A list of all open and visible windows are shown in Z-Order from the click of the tray icon. Selecting a window positions that window to TopMost (always on top/pinned) and now the highest in Z-Order. If you select a window that has already been given TopMost it will set it to NoTopMost (normal).
When more than one window is TopMost, the TopMost windows will take hierarchy in the order which you selected them. The first TopMost window will go to the bottom and recent to the top. TopMost windows will show up with a locked icon next to them in the menu. Normal windows will have their default window or system icon.
If a window you want to set to TopMost or NoTopMost is not shown in the menu list of windows you can use customised shortcut keys, found in Preferences menu, whilst the window is active.
Window Monitor
As of version 0.9.3 PinMe! contains a frequently requested feature to "Monitor" certain windows and automagically set them to TopMost.
When a window is being monitored PinMe! will remember the window(s) and, for example, after a restart set those windows to TopMost again.
One of the caveats with this feature is if you were to monitor a Notepad window all subsequent opened Notepad windows will be set with TopMost.
Feedback on this feature is warmly welcome.
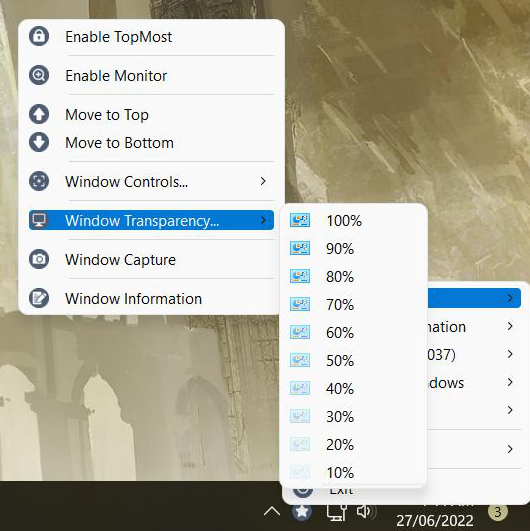
Window Transparency
There are two ways to change the transparency of a window. The first it to find the window in the menu list and from the, "Window Transparency", submenu set the desired level of transparency between 10% to 100% viewable.
If the window you want to set the transparency level of is not in the window menu list use the second method. From "Tools Menu..." menu select, "Enable Window Transparency". Once the setting has been activated you should see the same menu option now listed as, "Disable Window Transparency". Move the mouse cursor over the window you would like to change the transparency level of and scroll the mouse wheel until the transparency is at the desired level. Moving the mouse to other windows and scrolling the mouse wheel will change the transparency level of those windows until you go back to the tools menu to disable the feature.
Whilst this option is activated mouse scroll wheel messages are not passed to the window until this option is disabled, scrolling through a page in a browser or document for example will not be possible.
Capturing Windows
You can capture the contents of a window in each windows submenu. PinMe! will try to capture the window image even if it is located behind other windows. If it is unable to do so PinMe! will attempt to bring that window to the front before capturing.
Images can be saved in either .PNG, .JPG and .BMP., the image is also copied to the clipboard if you have the option enabled in Preferences.
Capturing Screens & Desktops
You can capture whole screens, desktop foreground and background. By going to, "Tools Menu...", you will find a submenu titled, "Capture Display Devices...". The submenu will contain a list of all the display devices currently connected and active including two options titled, "Capture Desktop Background", and, "Capture Desktop Foreground". To capture a screenshot simply select the appropriate display device and a save dialogue will appear to allow you to save the captured image to a folder.
The following options capture the entire desktop across all monitors/displays:
-
Capture Desktop Background,
- captures all of the desktop background across all display devices without any of the windows on top.
-
Capture Desktop Foreground,
- captures all windows on top of the desktop across all display devices.
Images can be saved in either .PNG, .JPG and .BMP., the image is also copied to the clipboard if you have the option enabled in Preferences.
Region Captures
Region capture can be activated by selecting, "Tools Menu...", then, "Enable Region Capture". Once you are in region capture the display will turn a slightly different colour and the mouse cursor will change to a cross hair with a square magnified window next to it.
There are two methods for selecting the capture points. The first is to click and hold down the mouse pointer at the start position and drag the mouse pointer to draw a rectangle over the area of screen you would like to capture. You will notice a coloured rectangular box will be created, this is the region that will be captured. The second method is to left mouse click at the first capture point then left mouse click at the second capture point. You will notice the cross hair will stay active at the first location, this helps you correctly size the corners of the rectangle you wish to capture.
To help you capture the correct region a magnify window is available. Inside the magnify window information will display the x and y coordinates of the cross hair position. A colour picker in the top right hand corner is displayed. The top left hand side shows the zoom factor which, you can change by scrolling the mouse wheel to zoom in and out of the image.
After selecting a capture region the save dialogue automatically appears. Images can be saved in either .PNG, .JPG and .BMP., the image is also copied to the clipboard if you have the option enabled in Preferences.
Exiting from region capture can be done by pressing the right mouse button.
Depressing the wheel mouse button at any time during a capture will cause the mouse to move at slow speed. This may help in correctly aligning the capture cross hairs.
Pressing the "SHIFT" key after the first cross hair has been set will delete it.
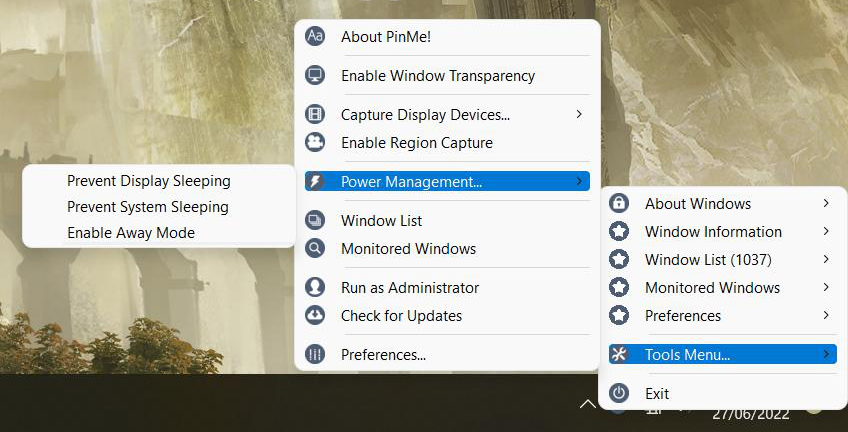
Power Management
There are three settings in the power management menu, these are to prevent the monitor or system from sleeping;
1) Prevent Display Sleeping
2) Prevent System Sleeping
3) Enable Away Mode
Window List
Window List displays all the windows on the current desktop including child windows in tree like hierarchy. There are options to filter for certain types of windows; Top-Level, Immersive, Store Apps, Children, Threads. Each entry is listed using its window handle and classname.
Double clicking on a window allows you to open the Window Information window to view its details.
Window Information
Provides information on the window details including dimensions and certain capabilities. For Store Apps there is a separate tab detailing basic package information.
There is a menu option here that allows you to point at a window using the mouse cursor to view its details.
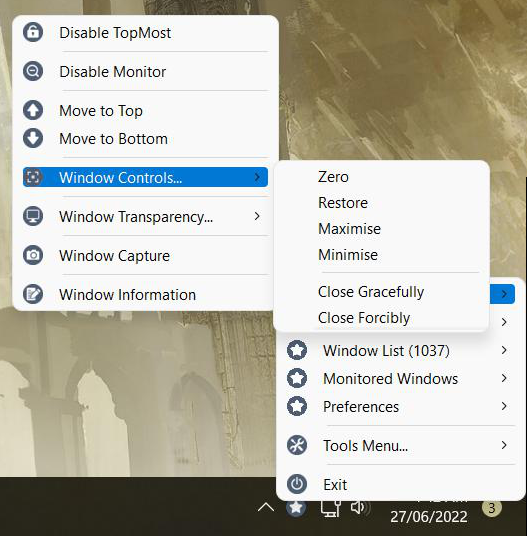
Window Controls
Under each windows menu there are options to send messages to the window to; Close Gracefully, Close Forcibly, Restore, Zero, Maximise, Minimise.
Shortcut Keys
In the Preferences menu you will find two options for customising shortcut keys to start region capture and set an active window between TopMost and NoTopMost. To configure this click in one of the shortcut fields and then select the key combinations you would like to use. If the key combination was successful the shortcut description will be set. An error message will prompt you if PinMe! was unable to do this, likely because the key combination has already been registered by another application.
Run At Startup
You will only see this menu option if PinMe! is not already running from the Windows startup folder.
When selected PinMe! will be copied to:
C:\Users\Username\AppData\Roaming\Microsoft\Windows\Start Menu\Programs\Startup
To update either;
- manually copy a new version to the startup folder or,
- whilst the new version of PinMe! is running (from another folder) select this option to overwrite the existing file.
Run As Administrator
Introduced in Windows Vista and used with subsequent editions, the Windows OS comes with a security feature called User Account Control - or UAC for short. UAC prevents programs and applications running with elevated (Administrator) privileges to help protect the operating system from being compromised by malicious software. By default PinMe! does not request elevated privileges. Because of this PinMe! may not by able to send messages to communicate a change of window state to a program that is running with higher privileges than PinMe!. This is due to another security technology called User Interface Privilege Isolation (UIPI).
If you find that PinMe! is not changing the state of a particular window you can request PinMe! to run in Administrator mode by going to, "Tools Menu...", menu and selecting, "Run As Administrator", which will let PinMe! run with high integrity. Once activated Windows will prompt you with a User Account Control dialogue asking if you want to allow PinMe! to make changes to the computer. Click yes if you do. Once PinMe! is running with high integrity in Administrator mode PinMe! will be able to send messages and communicate with those windows.
Preferences
Here is a quick overview of other available options, not mentioned above, in the Preferences menu that allow you to enable or disable features:
-
Sounds
- sound prompts and warnings.
-
Clipboard
- saving of captures to the clipboard.
-
Save Dialogue
- save dialogue prompt after captures.
-
Repeat Capture
- continue to the next region capture after saving.
-
Magnify Window
- enable or disable the magnify window.
Language Files
Upon startup PinMe! will try to determine the users interface language then search for that regions language file in the "Language" subfolder where PinMe! executable is located. All language files begin with, "lang_", suffixed by a three letter ISO language name for the region. E.g. for a user in Thailand using Thai language PinMe! will search for, "lang_tha.txt". If a language file is unable to be located PinMe! defaults to it's built in English language. PinMe! conforms to ISO 639-2 three-letter code for the language file suffix name. If you wish to create a language file for your region you can find your language prefix listed at Wikipedia:
https://en.wikipedia.org/wiki/List_of_ISO_639-2_codes
The language file must be saved in UTF-8. If for some reason your language is displayed incorrectly within PinMe! please try saving the file as UTF-8 with BOM (byte order mark).
What's New in Version 2022.09.28
Released
+ Fixed: Magnify & captures using incorrect coordinates on certain display arrangements
+ Fixed: PinMe! tray icon not being recreated on custom start/ taskbar replacement tools
+ Fixed: Window Information displaying incorrect Windows 11 pre-release feature values
-
 6
6
Recommended Comments
Create an account or sign in to comment